• Our Work
  • About
  • Consultations
  • Contact
Crawford Modern.
  • Our Work
  • About
  • Consultations
  • Contact

Preventing Renovation Delays

The two greatest annoyances Clients have at the end of their project is that it’s gone over budget and has taken much longer than expected. While a lot of delays are well outside the Client’s control, there are quite a few ways a Client can be at fault.

If you find yourself frustrated with how long your renovation project is taking, read further to see how you can help ensure you’re not contributing towards it.

Change Orders.

There are change orders that are out of a Clients’ control such as unforeseen repairs uncovered after demolition; however when a Client changes their mind on the scope of the project, expect to have significant delays. These changes of scope can seem minor — perhaps just changing a plumbing fixture — however all changes in direction will likely result in some sort of delay. While you may simply think, “My fixture is arriving in two days, so we will only be pushed back two days,” that is rarely the case as it oftentimes results in a butterfly effect of delays.

If your contractor had scheduled the plumber to arrive tomorrow, but your fixture isn’t arriving until a couple days later, the plumber may have to pivot and work on another project while they wait for yours to be ready. This could result in the plumber not being able to get back to your project for a couple of weeks! And what’s worse, any other subcontractor that was supposed to be scheduled immediately after the plumber will also have to rework their schedule for your project, and so forth.

It is crucial to really nail down your desires and materials for your project before anyone picks up a sledgehammer to demo if you don’t want to experience any significant delays.

Payment.

If you’re working with a contractor, you should have a contract in place. And that contract should detail the payment terms of when you’re expected to provide payment. It is typically up to the contractor’s discretion if they want to keep your project moving even though you’re late with making the next payment installment. Your contractor may opt to put a pause on work until you’ve honored the contract’s terms and made your payment.

If you have any questions or concerns about an invoice, be sure to bring it up with your contractor as soon as possible so it can be resolved and ensure there will be no hiccups with progress.

Over Communication.

Bombarding your contractor with multiple texts, phone calls, and emails throughout the day looking for updates causes your contractor to stop what they’re working on to answer you. It’s best to keep all non-emergent questions and concerns in one conversation or email towards the end of the day so your contractor can not only keep track of everything more easily, but also ensure they’re not starting and stopping work throughout the day. And if you have a few updates to give your contractor, make sure you keep all those thoughts in one conversation or email at the start of the day.

And finally, while it’s great if you enjoy your contractor as a person, it is best to keep all socializing until the end of the day, that is, if you’re concerned about causing delays.

Under Communication.

Conversely, if you are not communicating with your contractor, delays can be expected more drastically here as well. For example, if your contractor has a question for you about your preferred plumbing layout and you’re unable to respond by the time the plumber is to begin work, your contractor will then have to reschedule the plumber. Subcontractors really only want to come out to a project once, so more often than not, they will want to reschedule until everything is ready for them to begin. Which, as we pointed out previously, causes that terrible butterfly effect of delays.

Moving Out.

Your contractor may request that you move out of a specific room and/or your entire house throughout the duration of the project. Not only is this so a proper workspace can be established, but also helps ensure that the contractor does not have to spend each day cleaning up the work site thoroughly. While your contractor should always keep their worksite tidy, it is an undertaking to ensure the worksite is cleaned for livable conditions. Your contractor will now have to dedicate a percentage of each day of the project throughly cleaning the space to ensure it is livable instead of working on the project itself.

If your contractor wants furniture completely moved out of a space to work, it is because they need to be able to work freely and easily. Leaving furniture and/or belongings in a workspace for your contractor to work around will certainly tack days onto your project as well.

The Takeaway.

Not only do delays cost us time, they may cost us money. If your contractor has in the contract for you move out of your house or a particular room for your project, but you fail do so, don’t be surprised if your contractor charges more money to complete the project. The same goes for whether a subcontractor has to go out to your property more than once due to lack of communication on your end or last minute changes in materials. The familiar phrase, “Time is Money” is rings true in construction.

Wednesday 06.08.22
Posted by Crawford Modern
 

Crosscut Primary Bathroom Renovation

The Background.

Our client, a local artist with a keen eye for design and aesthetics, came to us about renovating her primary bathroom. The space had seen better days since the 1960s and it was a little too small for her and her (very) tall spouse. There was a little “nook” for extra storage between the bedroom and the bath that wasn’t being fully leveraged. We knew we wanted to use this area for extending the space so layout updates would need to be made.

BEFORE: The “nook” between the existing bathroom and bedroom.

BEFORE: The storage “nook” between the existing bathroom and bedroom.

BEFORE: Existing bathroom that housed a tub/shower, sink, and toilet.

BEFORE: Existing bathroom that housed a tub/shower, sink, and toilet.

The Layout Updates.

We enlisted the help of Kaitlyn Rose Interiors to help nail down an updated layout and provide some renderings for our client to visualize some potential tile selections and finishes.

Initial renderings of the space by Kaitlyn Rose Interiors.

Initial renderings of the space by Kaitlyn Rose Interiors.

After much deliberation however, we determined with our client that the two existing spaces were to remain separate instead of opening everything up. The client liked how the existing small bathroom kept everything warm and steamy after a shower so we determined we would keep the existing bathroom space separate, but make it purely a wet bath. The “nook” between the existing bath and bedroom would house the new vanity, toilet, and some storage.

It was initially proposed that the original tub would be eliminated to make a larger space for the shower; however the client really loved the tub (as did we!) so we salvaged it and kept it in its existing location. Since the tub was to remain in the wet bath area; we knew we would have to build a custom step to ensure the tub was elevated and fully waterproofed.

The Finishes.

Our client was very mindful of the age of their historic Mid Century Modern home when picking out the finishes. A new hexagonal floor tile (same shape as the existing) and a vertical stacked pattern for the walls were carefully selected to stick with the MCM style of the home.

A vintage dresser, fabricated during a similar timeframe in which the home was built, was sourced by the client for us to convert into a vanity as well. We reconfigured the drawers on the lefthand side as a door to allow easy access to the sink plumbing.

BEFORE: Making tile selections and ensuring the vintage dresser would fit nicely as the new, repurposed vanity.

BEFORE: Making tile selections and ensuring the vintage dresser would fit nicely as the new, repurposed vanity.

BEFORE: Unfortunately we could not salvage the original window as it would not be up to code in the shower; however we donated it with the hopes it ends up in another local home someday.

BEFORE: Unfortunately we could not salvage the original window as it would not be up to code in the shower; however we donated it with the hopes it ends up in another local home someday.

With the vertical stacked pattern on the walls, we knew we wanted to keep things as clean and polished as possible with the installation. Our goal was to ensure there were no awkward cut tiles in the corners of the wet bath and around the custom-built niches. In order to accomplish this, we thoroughly planned and executed framing to ensure that the measurements allowed for only full tile to be installed. This took a lot of extra time planning- and labor-wise; however it was well worth it in the end. The only cut tiles are around the existing window opening and the original tub.

AFTER: No awkwardly cut tiles in the corners of the wet bath area.

AFTER: No awkwardly cut tiles in the corners of the wet bath area.

AFTER: Custom-built (not pre-formed) niches were fabricated to ensure there were no awkwardly cut tiles around the niche(s).

AFTER: Custom-built (not pre-formed) niches were fabricated to ensure there were no awkwardly cut tiles around the niche(s).

And without further ado … here are some before and after shots of a project we are so proud of!

The Big Reveal.

Before and After.

BEFORE: Storage nook not used to its full potential.

BEFORE: Storage nook not used to its full potential.

AFTER: Sink relocated to this exact spot to allow for more space in the back part of the bathroom for separate tub and shower.

AFTER: Sink relocated to this exact spot to allow for more space in the back part of the bathroom for separate tub and shower.

BEFORE: Storage above the existing location of the toilet.

BEFORE: Storage above the existing location of the toilet.

AFTER: Toilet relocated into existing storage nook to allow for more space for the shower.

AFTER: Toilet relocated into existing storage nook to allow for more space for the shower.

BEFORE: The original louvered sliding closet doors were a bit cumbersome for bathroom storage.

BEFORE: The original louvered sliding closet doors were a bit cumbersome for bathroom storage.

AFTER: Open shelving (made from salvaged vintage adjustable shelves) provided easier access to linens. (Not to worry, the original louvered door style is found elsewhere throughout the home!)

AFTER: Open shelving (made from salvaged vintage adjustable shelves) provided easier access to linens. (Not to worry, the original louvered door style is found elsewhere throughout the home!)

BEFORE: Sink, toilet, tub/shower combo all crammed in one tiny space.

BEFORE: Sink, toilet, tub/shower combo all crammed in one tiny space.

AFTER: Sink and toilet relocated into existing storage nook to allow for extra space for tub and shower in new wet bath area.Note: Shower glass door to be installed between the two areas at a later date.

AFTER: Sink and toilet relocated into existing storage nook to allow for extra space for tub and shower in new wet bath area.

Note: Shower glass door to be installed between the two areas at a later date.

BEFORE: Old, worn tile makes original tub feel drab and outdated.

BEFORE: Old, worn tile makes original tub feel drab and outdated.

AFTER: Original tub gets a facelift with fresh tile surround / niche installation and updated fixtures.

AFTER: Original tub gets a facelift with fresh tile surround / niche installation and updated fixtures.

check out more “after” photos here.

All “AFTER” photos are by Rachel Garrison Photography.

Sunday 06.27.21
Posted by Crawford Modern
 

Our Little Blue Cottage.

Our New Home.

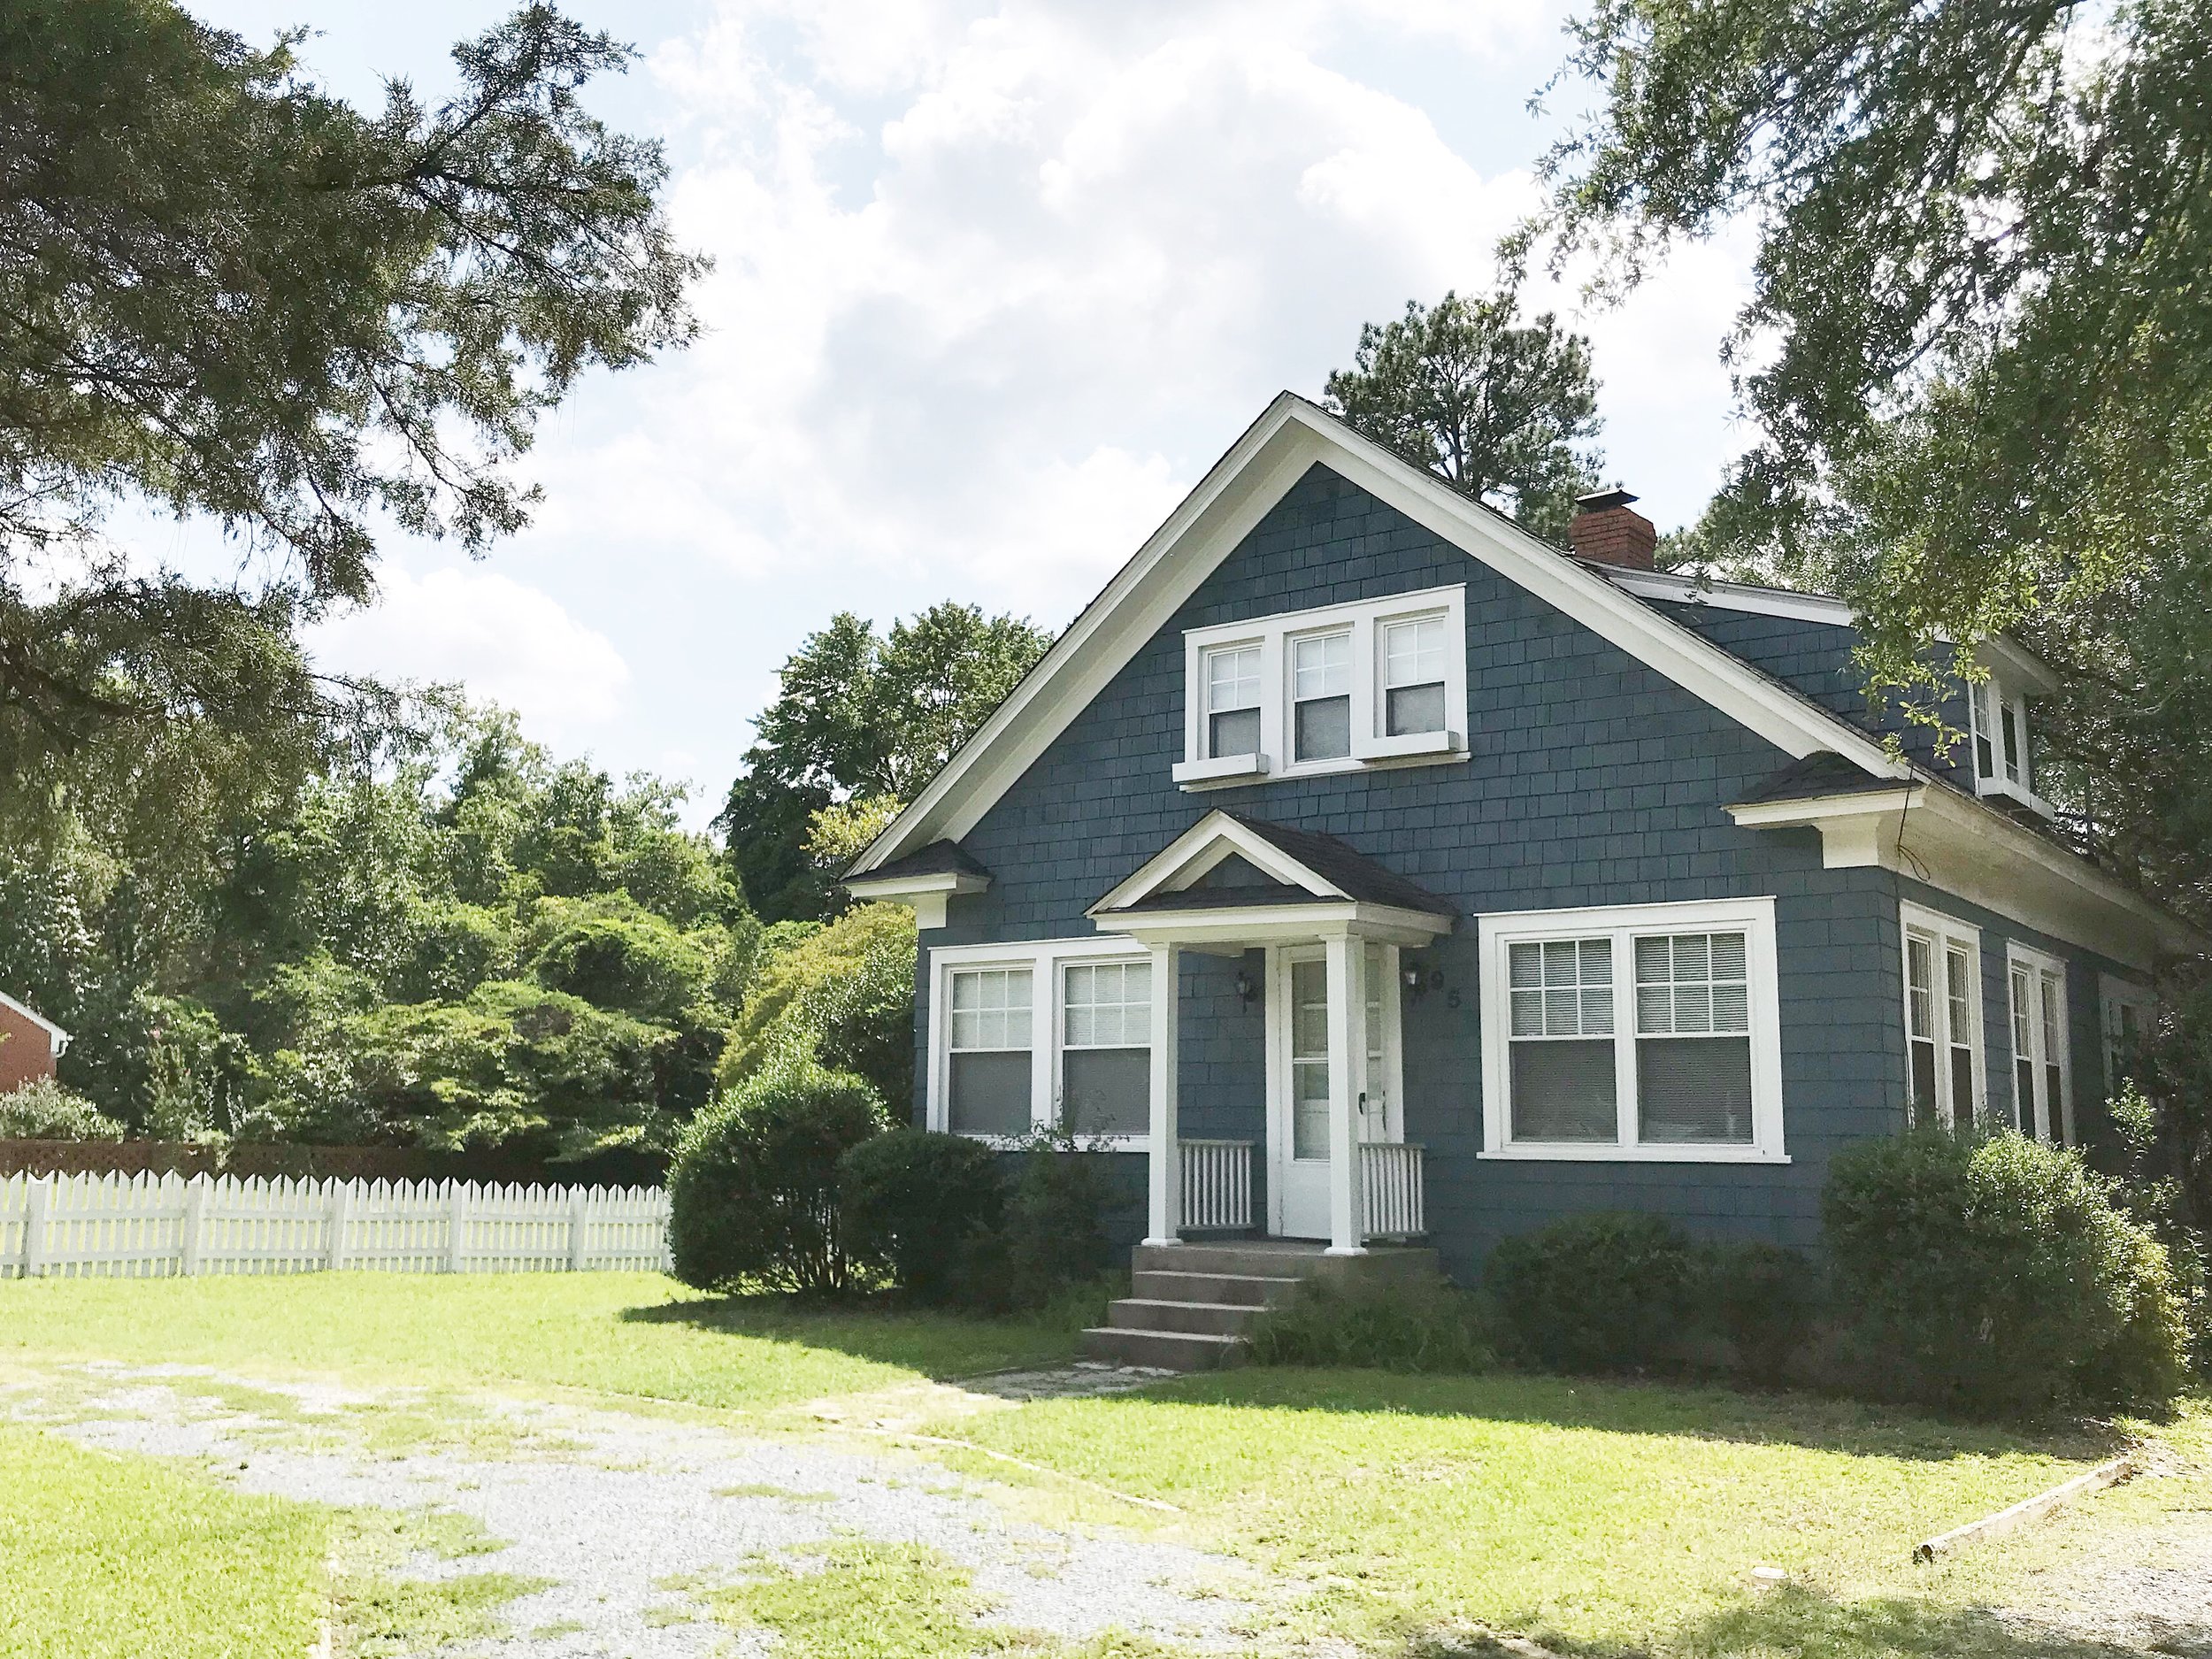
If you just recently started following our business, we bought a house over a year ago to hold onto instead of flip. It is a quick bike ride to the Village of Pinehurst and is in an area that is developing nicely. We love the idea of George walking to school one day too, as the Pinehurst elementary school is being rebuilt nearby.

To save some money, we decided to rent the house out for one to three years. We knew it was a fixer upper, but didn’t realize how much it was until we had tenants living there full time. To say our tenants were extremely patient is an under statement. To say we didn’t save a single dime within the first year of owning this house is also an understatement. The house needed to be almost entirely re-plumbed while our tenants lived there. We had to replace a dishwasher, faucets, etc. While we had a good handle on flipping houses (as electrical and plumbing were typically redone off the bat), we were pretty clueless about renting out properties. Fortunately, we had a kick ass Property Manager, Mary Margaret, owner of Merit Property Management. She and Jim were certainly very busy getting the house up to livable standards in the first few months.

Once we worked out the kinks, our tenants asked if they could extend their lease when it came time to renew. I thought they were crazy, but I was pumped. Within the first few months of renting, they had re-graveled our entire driveway, built a little garden box in replacement of where an oil tank used to be buried, revamped our landscaping, and painted mostly every wall in the house Agreeable Gray by Sherwin-Williams. Not to mention the house was in its peak clean state.

But all good things must come to an end because our tenants decided to buy the house next door! This left us with a tough decision to make—whether to move in ourselves or rent it out to a new family. It goes without saying the bar was set extremely high for future tenants. Jim has repaired various rental properties over the past couple years, giving him a firsthand experience of what an awful tenant looks like. We knew we may not luck out again.

So, we decided to officially move into our house this past October. The house is relatively old (as we found some old knob and tube wiring), but it had seen some electrical and aesthetic updates especially in the 80s. We did some research at the Tufts Library in Pinehurst and discovered this home was actually owned by golf course designer, Donald Ross, at some point and was originally named The Sperry Cottage. It was also in another part of the Village of Pinehurst, but was relocated during the 50s.

We love that this house has so much history and character and can’t wait to restore it.

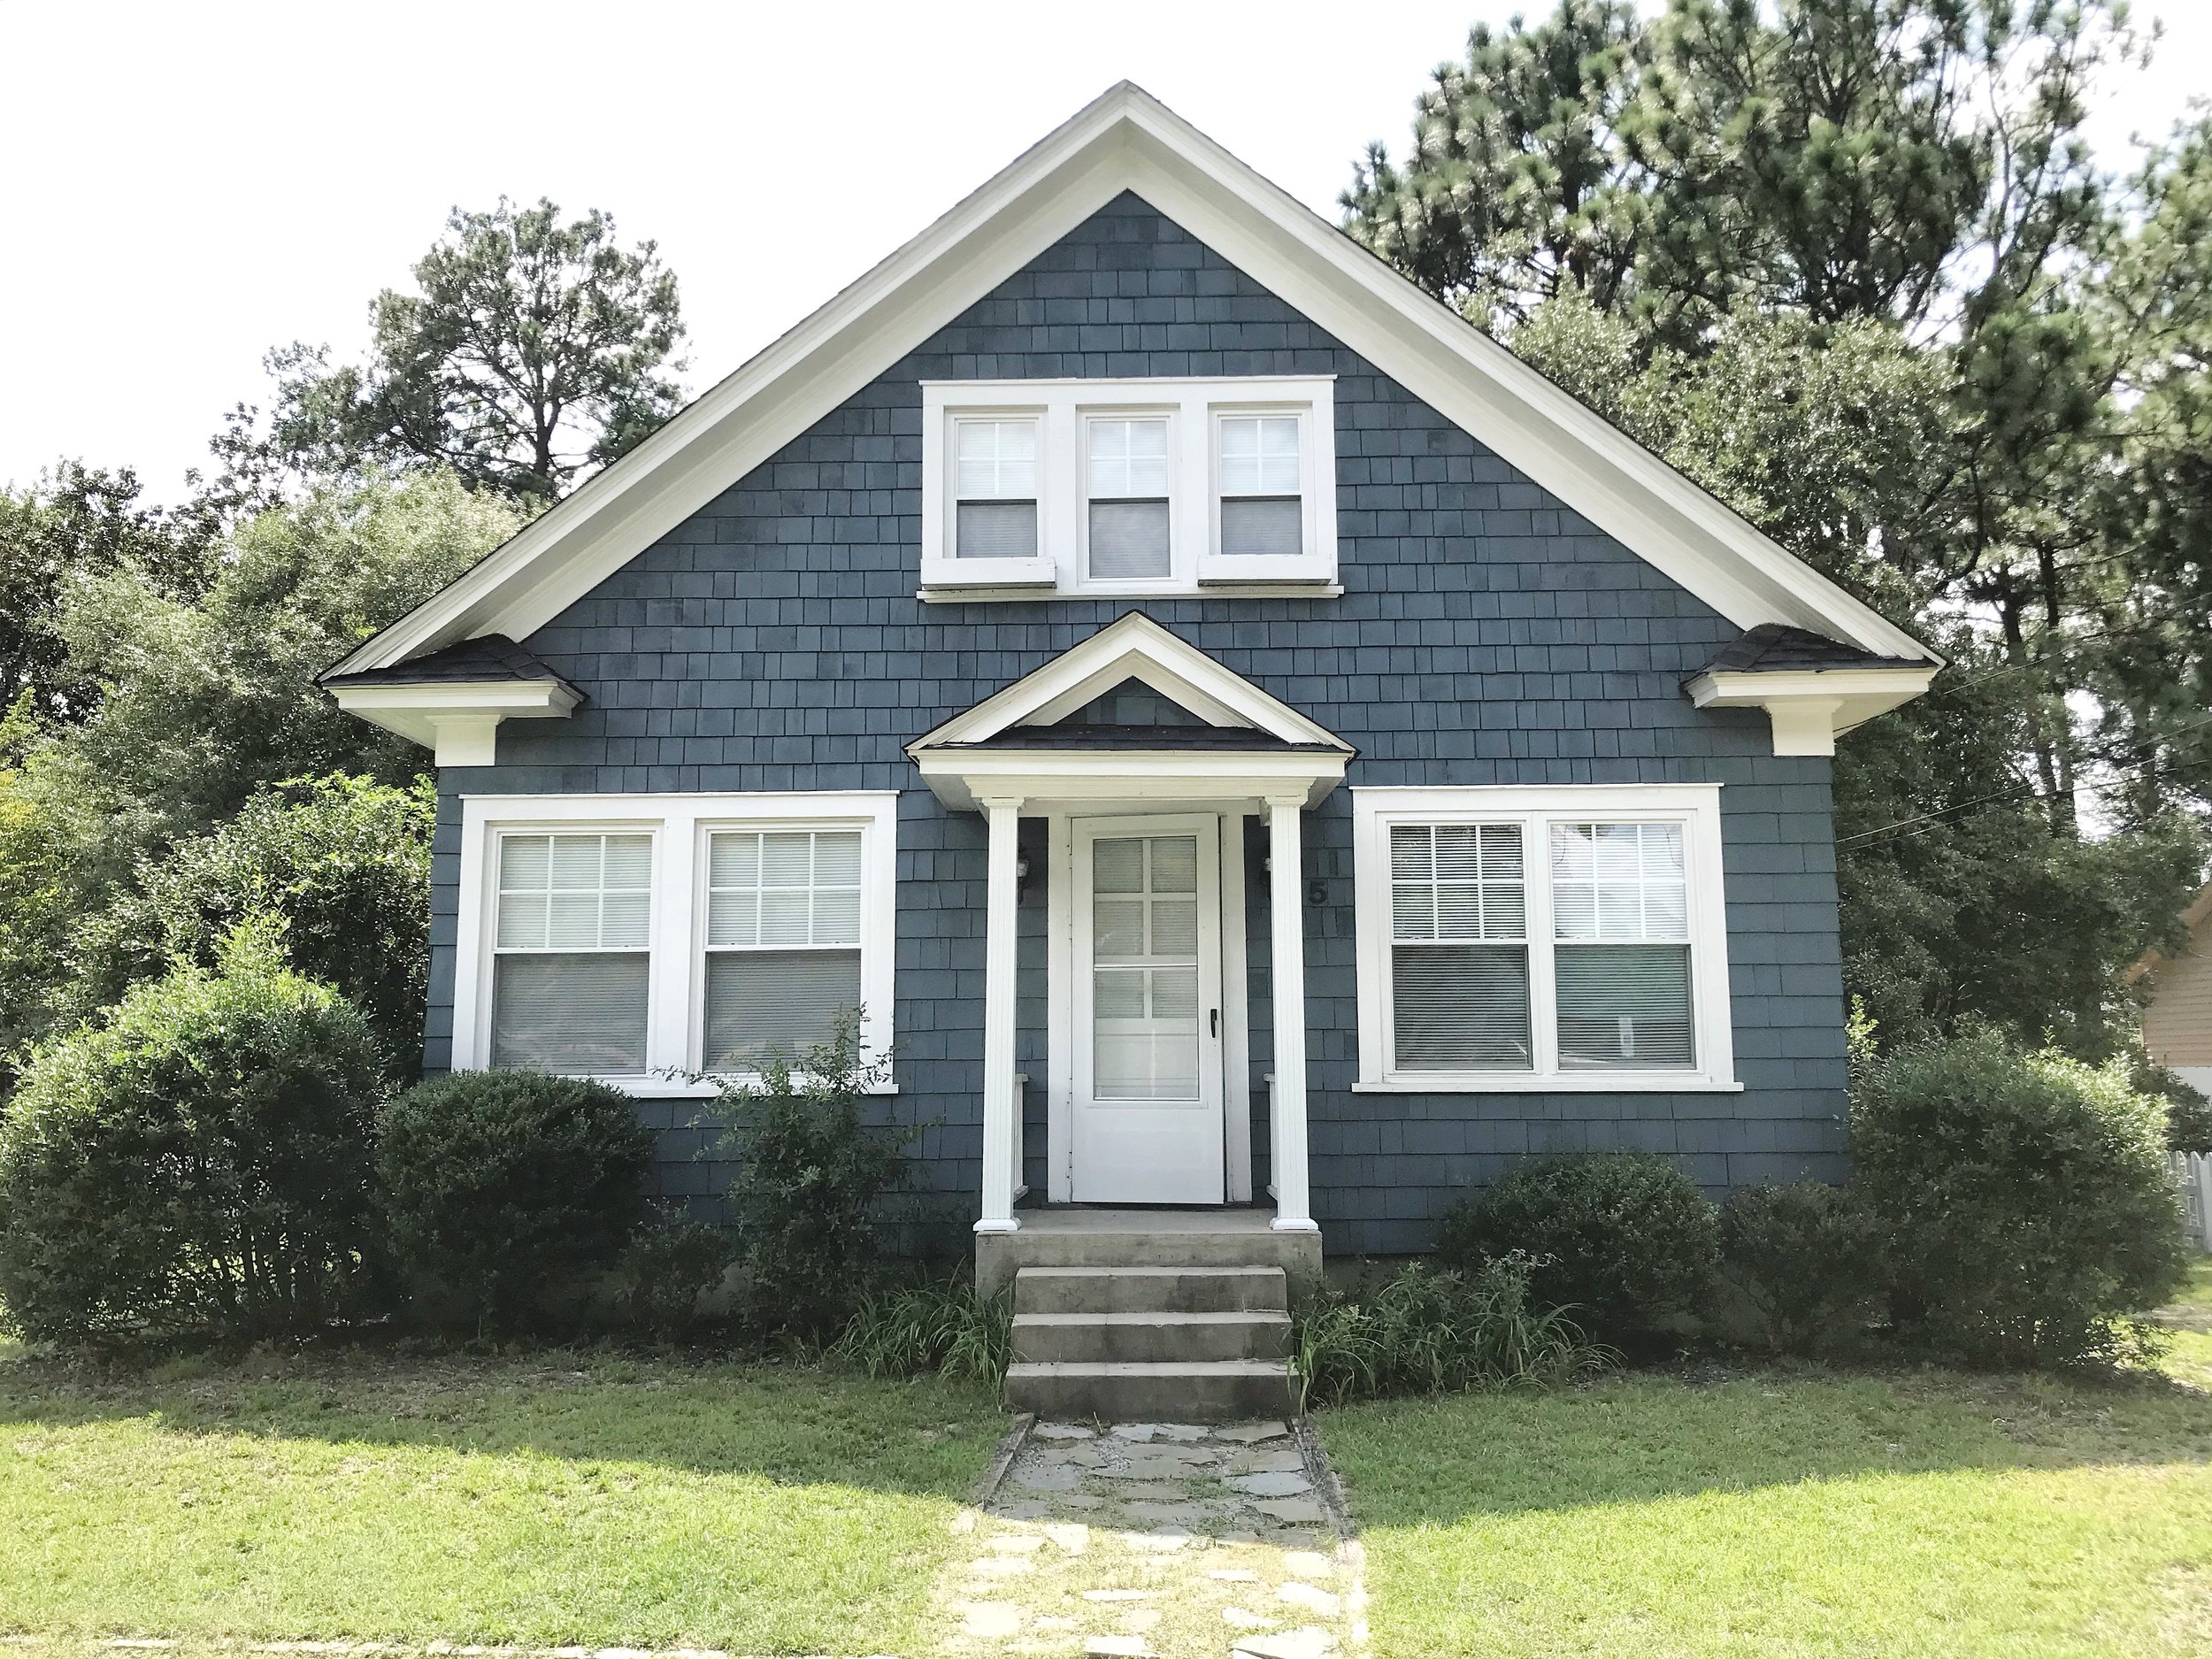
Our little blue house! (Before the new gravel driveway)

Our little blue house! (Before the new gravel driveway)

And without further ado, here is a mini tour of the place in all its vintage glory:

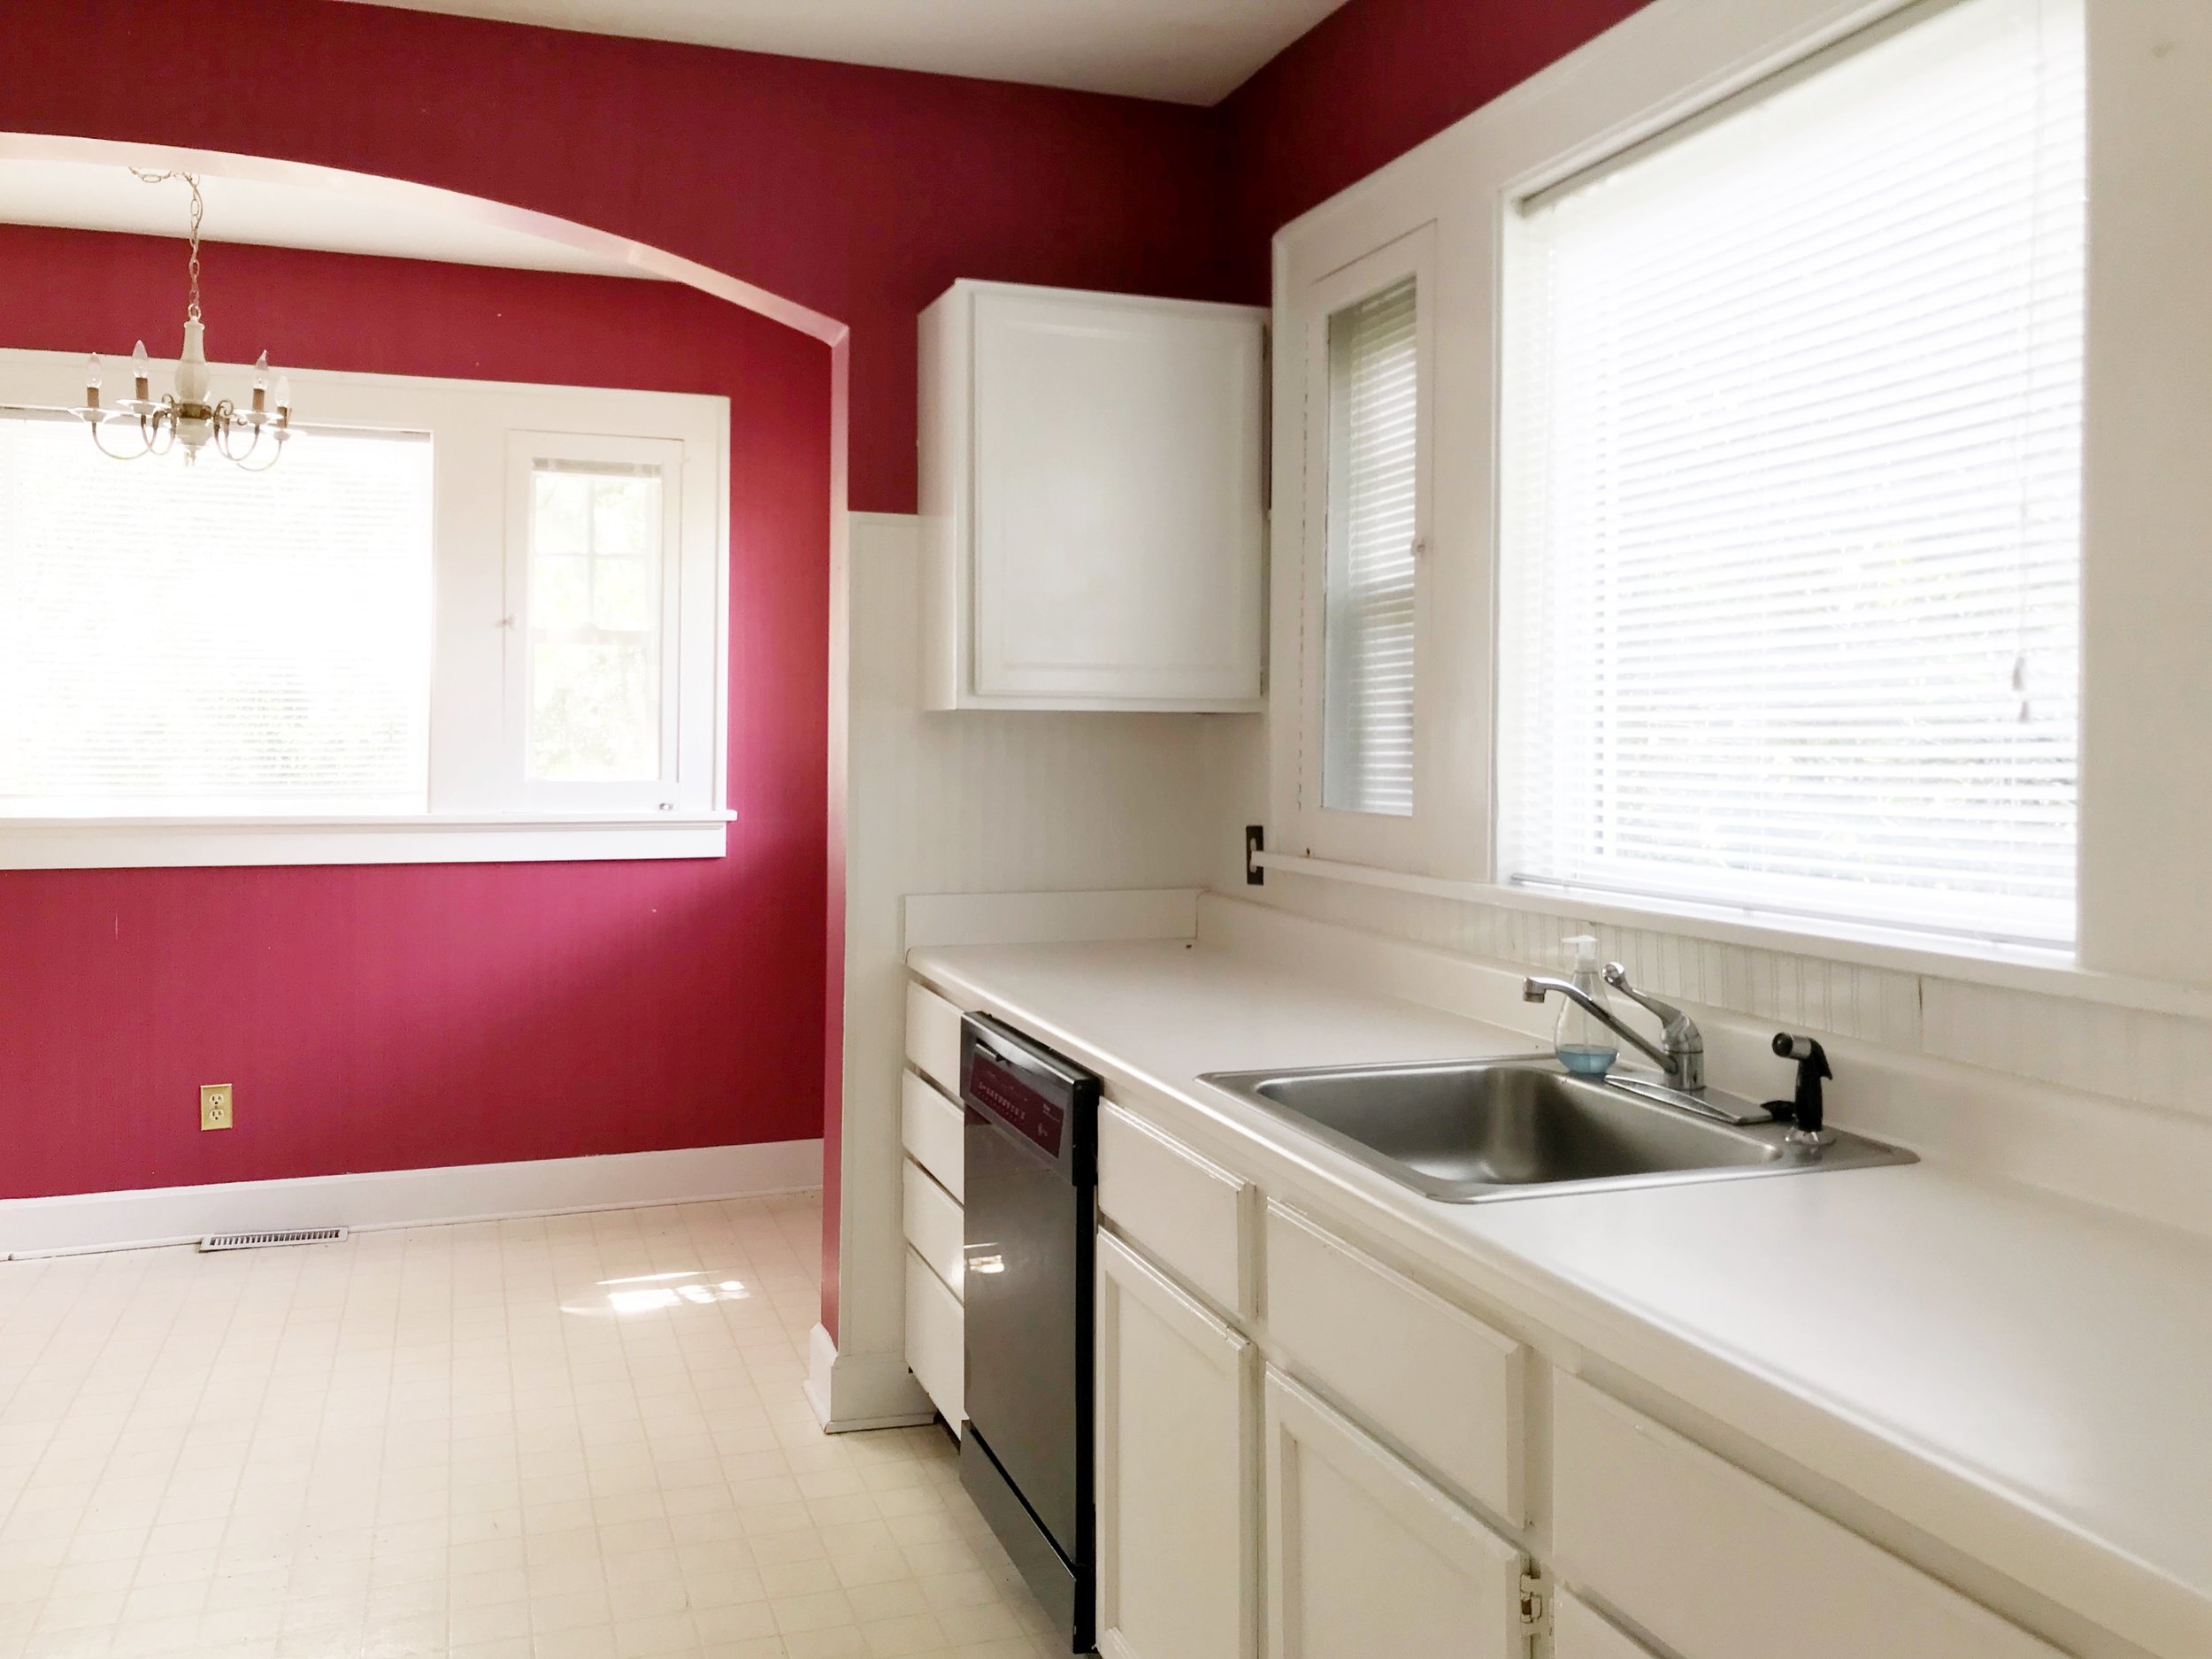
The Kitchen.

What we plan to update:

Currently the kitchen floor has some sloping so we will want to fix the structural issues before we really get down to renovating in the future. We will probably slightly extend the back of the mudroom area to the left of the kitchen. The back half of the kitchen actually contains both dining and laundry so we will want to relocate the laundry area into the mudroom without drastically changing the footprint of the home. We love that this home is quaint and don’t want to get too crazy with extensions. The red/pink wallpaper was super rad (most likely from the 80s) however had seen some wear and staining over the years. Our tenant ended up painting the wallpaper before we moved in so we will need to address that down the road. We recently discovered that there is heart pine under two layers of linoleum flooring. This is likely going to be a headache to properly restore, but we are up for the challenge.

What we love about this space:

We love the character of the swinging solid wood door leading into the kitchen. We also love the archway separating the kitchen area from the dining/laundry and will aim to salvage this feature when renovating down the road.

Laundry area strategically cropped out of photo.

Laundry area strategically cropped out of photo.

That swinging door, though!

That swinging door, though!

The Living Area.

What we plan to update:

Mostly aesthetic updates especially addressing the mismatched flooring. Half the room is quarter sawn heart pine and the rest is regular pine (you can even see in photo below). We will also revamp the fireplace. There is brick behind the sheetrock above the mantel; however it is not pointed as nicely as the brick that is exposed.

WHAT WE LOVE ABOUT THIS SPACE:

The wood burning fireplace (after some aesthetic updates of course)!

Just need some aesthetic updates in the living area.

Just need some aesthetic updates in the living area.

The Master Bedroom.

what we plan to update:

The master is currently on the first floor next to the living area; however we are converting it into an office space for the time being with only one kid. Where we lived previously, all my artwork and company paperwork was strewn about the entire home so I want to be sure to contain all of it somewhere, especially in a significantly smaller house.

What we love about this space:

The solid wood doors and antique hardware. And all the windows on the lefthand side of room (not pictured).

Those solid wood doors and antique hardware!

Those solid wood doors and antique hardware!

The Guest Bedrooms.

what we plan to update:

Again, mostly aesthetic updates -- new paint, light fixtures, etc.

What we love about this space:

The built-in dressers! A great way to help address the limited storage space issue as the rooms, although cute, are tiny. We will likely rebuild these and properly insulate down the road, though.

Both guest bedrooms have built-in dressers that allow more space for living!

Both guest bedrooms have built-in dressers that allow more space for living!

The Office Nook.

what we plan to update:

We plan to swap out the upper cabinetry for some open shelving so the space seems less claustrophobic. Jim is excited to turn this into a fly-tying and office space for himself.

What we love about this space:

The fact that this feature even exists.

A cute little open area on the second floor to the left of the stairs.

A cute little open area on the second floor to the left of the stairs.

The Exterior.

what we plan to update:

In terms of landscaping, we want to improve the circular drive in front of the home. We think a front porch would also be a nice feature since it's across from the baseball field. Instead of a shed in the back, we plan to build a secondary, small accessory building for Jim's workshop and possibly an art /hobby studio above it. We will eventually eliminate the not-so-aesthetically-pleasing back deck and replace with a stone patio.

What we love about the exterior:

The adorable wooden window boxes. The fact that the exterior is cedar shingles. And the unique white picket fence (pictured above).

The window boxes on the second floor are simply darling.

The window boxes on the second floor are simply darling.

Back deck will likely be eliminated to accommodate a higher end-looking patio.

Back deck will likely be eliminated to accommodate a higher end-looking patio.

tags: crawford modern, little blue house, rental property, investment property, investment, rental
Thursday 01.02.20
Posted by Crawford Modern
 

What My Previous Job Taught Me About This One

Most of you probably don’t know, but I (Grace) started out my career in advertising. I often had two roles (albeit with only one salary)  — as Account Executive (liaison between client and creatives) and as Project Manager (internal timeline and budget management). I think this is where I started down the career path of continually trying to “do it all.” (DIA instead of DIY, anyone?) This is also when I acquired my constant anxiety of figuring out the “worst-case scenarios” of every project to make sure they ultimately don’t occur. 

While I knew pharmaceutical advertising was not where I was supposed to be in life, I learned a lot of valuable lessons that I have applied to our company, Crawford Modern. I think these lessons, regardless of your career, can be extremely valuable. 

And here they are…

  1. Predict client needs and anticipate changes. 


    If you’re a nurse, you may recognize this idea for working with a patient. It also works with clients outside of a hospital. When I first started in advertising, I had this drummed into me. I remember running my first convention for a client in pharmaceuticals. My supervisor was disappointed that I hadn't ordered some specific brochures for our booth. As a novice, I didn’t understand—the client didn’t ask for these brochures—why should I have proactively ordered them? My supervisor explained that while the client didn’t ask for them before, they’re going to need them later. She was right. After being humbled by this experience, I learned that sometimes clients don’t know what they want until it is too late to fix. And even if you're not in the wrong, it doesn't help to be caught by surprise. So, always try to be two steps ahead of your client at all times. While pretending to be Miss Cleo with her crystal ball can naturally provoke some anxiety, in the long run, it is wiser to anticipate needs and avoid backpedaling / retrofitting when clients change their minds—or when they remember something they need at the eleventh hour. Ultimately waiting until the end to fix issues that could have been simply avoided is more stressful in the long run. It’s always good to put on your pretend client hat and add value by grasping needs and challenges they aren’t even aware of yet. With that said, in order to accurately anticipate your clients’ desires and challenges, you need to understand them fully and as individuals with unique needs—which brings us to my next tip…

  2. Always adapt.


    Every client is different. You may be thinking, “Well, I run my company in a certain way, and if clients want to work with us, they need to work within our policies.” And yes, while you should remain true to the core principles of your business, it is helpful to adapt to each individual client and his or her unique needs. Some examples in personalizing your client’s experience: if they are timeline- and budget-conscious, take the extra step to proactively share financial reconciliations and status updates on a routine basis. If they are new to the process (or the services you may provide), take the time up front to educate them on all the steps from conception to completion. If they have trouble seeing the vision—provide renderings, mood boards, photos, or even draw them a picture. Recently we quickly comped up a physical prototype of a kitchen island for our client to react to. Renderings are super helpful in visualizing the end product; however sometimes a client needs to literally experience it before buying it—similar to test driving a car. That extra 30 minutes spent putting together a prototype island before fabricating the real deal will pay off in the long run as the client was able to fully understand the exact location and size of it. It would have been a nightmare to spend hours constructing this beautiful island if the client ultimately decided the exact location and size were not suitable for their needs. It’s obviously unrealistic to do this for every client as every case is different, but it was certainly helpful in this particular instance. In sum, the time you spend adapting and anticipating in a meaningful way will not be wasted and will ensure your client has a great experience working with your company.

  3. Provide a “$100 experience.”


    One of the smartest people I met in my marketing career was a partner at my last job. His Minnesota-based company had just acquired our NYC start-up. He wanted to make sure we were all aligned with his expectations of client service.
    In a conference room, he told us that the envelopes he held each contained a $20 bill. He handed an envelope to everyone in the room and told us to open them. 
    He asked how many of us got $20 in our envelope. Only a third of the room raised their hands. He asked how these people felt: “Good. You told me you’d give me $20, and you delivered on that promise.” He then asked how many people got $1 in their envelopes. Pretty much the remainder of the group raised their hands: “Ripped off — you told me you were giving me $20, and I only got $1.” Finally, he asked who got the $100 envelope. It was only me. Well, obviously I felt great—he told me he was going to give me $20, but I got five times what was promised.
    The moral of the story was this: always aim to give your clients a $100 experience. Promise them $20, but with the goal of giving them $100. And, never, ever over-sell and give the dreaded $1 experience. Better to under-sell and over-deliver than the other way around.
    It’s been quite a few years since I experienced this lesson and it has stuck with me. The $100? Not so much.

  4. Better to over-communicate than under-communicate.


    Even though you’re working on a project that is right under your client's nose — a kitchen remodel in their very own home, for example — you don’t want to assume they know where the project is at any given time. It’s important to take the time to update your clients frequently and give them the peace of mind that things are moving along and of course, within budget. You do not want to go days—or worse weeks—before telling them in detail how everything is moving and what the next steps are. Projects, especially ones at a client’s home (such as renovations) can be extremely stressful and unpredictable—especially to those who don’t live it every day as a business. So it’s good to keep communication open and frequent.

  5. Hold “Daily Stand-ups” (status meetings) internally to benefit your clients externally. 


    At my previous job I became a certified Scrum Master to beef up my project-management game. While the role of being a Scrum Master is definitely not as applicable to renovating a home as it is to developing a web site (long story), the daily stand-up meetings facilitated by a Scrum Master are a huge plus with any company. You’re supposed to stand to ensure it is in fact a quick meeting. It should really only be 15-minutes max. You discuss with your colleagues three things: 1) What you did yesterday 2) What you're going to do today 3) Any impediments that are preventing anyone on the team from meeting a goal.
    If it’s only you, it’s still essential to go through this exercise with just yourself. Sometimes when running a business, fires need to be put out so other “to dos” or projects get put on the back burner. It’s always good to review what you did that day and think about what didn’t happen as well as why it didn’t. That way you’re able to prioritize what needs to get done the following day. Again, while you may have your priority projects straight, the little ones may get pushed to the wayside—ultimately giving those clients and their smaller projects that $1 experience nobody wants. 
    Jim and I touch base everyday with our projects as things are always evolving. There is never a day that goes exactly to plan. While Jim is focused on the bigger picture—plus what tools, laborers, and subs he needs—I am tasked with figuring out the minutia of how we get to the end goal and of course, within budget.

Those are my top, general insights for running a company with solid client management. While you can’t always please everyone, these tips can help alleviate some of the inevitable strains projects can create with clients.

The other important thing to realize is this: any experience you had in a previous job can be leveraged for your benefit in your current career.

…And if your client wants you to sing karaoke in New Orleans 3 hours before you need wake up and set up for a huge convention, YOU DO IT.

…And if your client wants you to sing karaoke in New Orleans 3 hours before you need wake up and set up for a huge convention, YOU DO IT.

Friday 03.01.19
Posted by Crawford Modern
 

Crawford Modern 2018 Year In Review

Based off of our bank account, I would have thought 2018 was a veryyy slow year, but that is completely untrue. I always have to remind myself that we’ve come a long way in getting our company off the ground and running and this is a wonderful list of accomplishments to refer back to, when in doubt! I can’t believe how many different things we dipped our toes in this year all the while adjusting to life with a newborn. Whatever furthers our knowledge, continues to challenge us, and more importantly helps pays that never-ending stack of bills, am I right?

Without further adieu…2018 in chronological order:

George.

First things first, on January 14th we welcomed our first born, George Carey, into the world. This was something we hoped for quite some time and are so blessed and grateful for this little guy. He is what motivates us to work hard and do whatever we can to ensure we are successful.

Kat Cloutier Photography

Kat Cloutier Photography

Kat Cloutier Photography

Kat Cloutier Photography

Guest Suite Completion.

We started creating a guest suite from an unfinished attic space back in Q4 of 2017; however we did not complete until one week after George was born. It was definitely a challenge getting the floors refinished and moving all the furniture in after George arrived early; however somehow we managed. Don’t ask me how because I blacked it out.

You can view more photos and read about the Gingham Guest Suite process here.

crawfordmodern_guestsuite1.jpg
crawfordmodern_guestsuite2.JPG

Styled Photoshoot.

In early February, we tried out photography styling with some lovely Pinescone treats for the local magazine, Pinehurst Living. Jim also found time to fabricate some beautiful tile boards for me to use when styling these scones. This was such a fun and delicious project and we are so grateful for the experience and the connections we made along the way.

crawfordmodern_scones1.jpg
crawfordmodern_scones2.jpg

Flipped A House.

Two weeks after George was born we got started on another flip in Southern Pines. We were under contract before the house even hit the market in May — our quickest flip to date. This home was the most challenging budget-wise, but we made it work with some very creative solutions that did not sacrifice the quality of the flip.

You can view the completely renovated home here as well as read about how we got creative with the master bathroom.

crawfordmodern_glenwood1.jpg
crawfordmodern_glenwood2.jpg

Electrical Level 1 Course.

Jim wanted to expand his knowledge of electrical work so he completed an Electrical Level 1 Course at Sandhills Community College. He would spend hours working on our flip during the day and attend 3+ hour evening courses a couple nights during the week. I still can’t believe he did this, all the while adjusting to life with a newborn.

Company Direction Change.

We upgraded our company name from “Slygho” to Crawford Modern. More importantly, we made the difficult decision to take a break from house flipping and ultimately work on developing business relationships with clients local to the area. We rolled out a new logo and web site to fully represent our aesthetic. This also meant figuring out Search Engine Optimization and other behind-the-scenes stuff with web site creation.

You can read more about why we changed our company direction here.

Staged A House.

We were asked to stage a Pinehurst home that had been on the market for four months without any action. It was a great challenge to stage a house that had seen better days as opposed to one of our freshly renovated flips. The best part: this home went under contract within two weeks after staging (bonus: with the first buyer to see it staged)!

You can read more about our staging process and aesthetic here.

crawfordmodern_oakmont1.jpg
crawfordmodern_oakmont2.jpg

Long-Term Investment Property.

We bought a cute little cottage in Pinehurst we envision ourselves as a family to enjoy for years to come. While we continue to get our business up and running, it will be rented out with Merit Property Management for a couple of years. We’ve learned so much about being landlords (as opposed to flippers) and have started brainstorming ways to potentially acquire another local investment property in the future.

crawfordmodern_rental1.jpg
crawfordmodern_littlebluehouse.JPG

Rental Property Repairs.

Many repairs were made to multiple properties (including our very own little cottage). With Jim’s background in residential construction, he has been an asset to local property management companies. This has helped us tremendously in between larger projects.

Teenager’s Bedroom Makeover.

This initially gave me the most anxiety as I am scared of teenagers; however I ended up having a great time assisting a sweet Pinecrest High School student achieve her dreams of a bohemian-vibe bedroom. Pictures to come soon!

Art Performance Piece for Oliver Jeffers.

When the timing works out, Jim builds Oliver Jeffers’ boxes for his dipped painting performances. As we were up north frequently this year, Jim was able to fabricate another in August. We love collaborating with Oliver — whether building things for his studio, frames for his beautiful paintings (PS - Bono owns one of Oliver’s paintings that Jim framed!), or boxes for his art performances.

You can see more examples of our custom wood-working projects here.

crawfordmodern_oliverjeffers1.jpg
crawfordmodern_oliverjeffers2.jpg

Decorated A House.

Shortly after we rolled out our new branding and web site, a couple reached out to see if they could give us the keys to their house and decorate it before they hosted Thanksgiving for their family. It was fun going on the thrifting hunt (both locally and online) to stay within budget—all the while not sacrificing the aesthetic. Jim was also a tremendous asset by installing a beautiful mirror-tiled backsplash and shelving for the bar in the living area.

You can view more photos of the fully decorated home here.

crawfordmodern_crestview1.jpg
crawfordmodern_crestview2.jpg

Rebranded Merit Property Management.

We helped launch a rebrand for this local Moore County business. A new logo, Instagram account, rental signs, and web site were created. We took all our learnings from rebranding our own company and were able to apply it here.

crawfordmodern_meritpropertmanagement1.png
crawfordmodern_meritpropertymanagement2.png

Bathroom Remodel for a Client.

We had the opportunity to renovate a 1970s master bathroom in Pinehurst. And as we have a passion for renovating ugly bathrooms from the 70s/80s, this was a lot of fun. We were fortunate to work with clients who had a clear vision of what they wanted and look forward to renovating their guest bathroom in the future.

crawfordmodern_bathroomremodel1.jpg
crawfordmodern_bathroomremodel2.jpg

Long-Distance Staging Gig.

This was a couple firsts for us — staging with a seller’s furniture as well as doing it long distance. We helped stage a condo in New Jersey without stepping foot in it during the entire process. It was a very collaborative experience and paid off as the home received 5+ offers within three days of being on the market.

You can read more about our long-distance staging process here.

crawfordmodern_quartzstaging1.jpg
crawfordmodern_quartzstaging2.jpg

Art Commissions.

In addition to selling lots of my artwork in our booth at Pastimes, I had the privilege of creating some nude line drawings for a couple located in Brooklyn. I’ve also recently begun a large abstract commission piece (to be custom-framed by Jim). This piece will be completed in 2019. Can’t wait to share more details soon!

In the meantime, you can check out more of our artwork here.

crawfordmodern_art1.JPG
crawfordmodern_art2.jpg

Design Consultations.

From providing paint color recommendations for a newly purchased home to assessing fixer upper houses for potential buyers, we’ve done numerous consultations over the year. We are grateful for all the people we have met who share a common interest in making their homes beautiful and perfectly theirs.

Other Fun Stuff.

We also tried out real estate photography (the house went under contract in under a week with multiple offers!), took a QuickBooks course with Sandhills Community College, successfully learned how to propagate plants (this is a feat considering we killed many-a-plant a year ago), and of course have continued to sell treasured vintage items out of our booth at Pastimes Antiques.

Thank you for following along on our business adventures. We are so grateful for all the love and support we’ve received this year and look forward to 2019.

Sunday 12.30.18
Posted by Crawford Modern
 

Long-distance Staging Gig

Recently we were asked to stage a condo in New Jersey. We visit NJ often, so the original plan was to bring small decorative items up from our staging collection, work with the sellers’ existing furniture, and be onsite to stage the condo before listing.

Well, life happens and sometimes puts a wrench in the plan. The listing date got pushed back and we were overwhelmed with some work locally in Pinehurst.

The Improvised Plan.

Given our crazy schedules, we all agreed that it would be best to try to stage the home remotely.

First, we came up with a game plan of relatively quick, cheap things to address before staging and listing the condo. These recommendations were based off of our knowledge that the sellers were handy — they could easily swap light fixtures, do minor plumbing, and paint without having to hire someone and spend a large amount of money. Those “prep work” recommendations were as follows:

1) Paint the condo a light, neutral color throughout.

2) Touch up the kitchen cabinet paint and add hardware to dress them up.

3) Update the outdated formica / fluorescent light fixtures in both bathrooms.

4) Convert their kid’s play area back into a dining area.

5) Update the guest bathroom mirror and old vanity.

6) Declutter by moving out any large furniture and decor that were really worn in and only took up space.

We also toyed with updating the formica kitchen countertops with a level A granite, but the listing agent said they would not see a return making that specific update in their neighborhood.

The condo is located in the bottom right with all the lovely hanging plants.

The condo is located in the bottom right with all the lovely hanging plants.

The Long-distance Staging Process.

Once all the recommended prep work was addressed, we got to the fun part of staging. We established and agreed upon a process to ensure our collaboration was as efficient as possible.

I know the condo fairly well, so this was obviously an advantage when staging remotely. I knew what vintage runners I had on hand that would fit well in the guest bathroom, master bathroom, and kitchen. I shipped those and a few other small decorative items I had available for them to use.

After the seller painted the home and decluttered, they sent photos of all the rooms in the home indicating what furniture and decor I had left to work with (plus my small pieces that were shipped up there).

Obviously selling a home can be a very expensive process, so I wasn’t about to recommend them getting a new sofa, dining table, etc; therefore we worked with all existing large furniture items.

In a nutshell, this particular staging process looked like this:

1) After prepping the space (e.g. declutter, paint walls, etc), seller sends photos with remaining furniture and decor items to work with.

2) I mark-up photos indicating where I am confident I want existing items to be placed with as much detail as possible. I request any measurements needed to get a better picture of the space as well. For example, I needed the measurements of the new guest vanity to ensure the new mirror I recommended was an appropriate size.

3) Seller then sends me updated pictures of everything in place as I had previously recommended.

4) I make some tweaks (marking up the new photos provided) and now attempt to fill in any “holes” after everything available is in place. These recommended fillers are small, inexpensive decorative items that the owner may or may not consider purchasing to supplement the existing staging items. I researched a lot of items knowing what stores are local to the area. I advised on what they could probably find at a Goodwill on the cheap. I also provided links to actual items to consider purchasing, or at a minimum, showed a “look” I wanted to achieve—sending multiple example photos for reference.

5) After the seller decides what small staging items they want to buy based off of my recommendations, we are ready for a FaceTime meeting. Here, the seller gives me a tour of the house with all staging materials in place. I then provide on-the-spot tweaks. We will get as detailed as possible. I’m not afraid to ask if a bowl on the counter can be moved two inches to the left. I really try to treat the staging experience as if I was actually present, playing around with the staging objects at hand.

Once everything looks good — after however many FaceTimes are needed — the house is ready for its debut!

Below are some examples of guidance I sent to the seller on how to stage their home.

Example of Guest Bathroom Guidance.

Accurate measurements from the seller are crucial when recommending the appropriately sized decor items such as this vanity mirror.

Accurate measurements from the seller are crucial when recommending the appropriately sized decor items such as this vanity mirror.

Example images of the “look” that should be achieved can assist the seller on how to stage the space with ease.

Example images of the “look” that should be achieved can assist the seller on how to stage the space with ease.

Links to inexpensive items are shared with the seller.

Links to inexpensive items are shared with the seller.

Example of Master Bedroom Guidance.

Provided a quick “sketch” of how styled shelves should be balanced in addition to an example of books shown “spine in.” We ended up not eliminating the small chest of drawers since the seller ran out of space in their new temporary home. It looks mu…

Provided a quick “sketch” of how styled shelves should be balanced in addition to an example of books shown “spine in.” We ended up not eliminating the small chest of drawers since the seller ran out of space in their new temporary home. It looks much better in the “after” photos with an orchid the seller placed on top of it.

Quick “sketch” of how pillow arrangements and throw should look on bed.

Quick “sketch” of how pillow arrangements and throw should look on bed.

Another example of guidance on how to style the seller’s existing furniture and decor items.

Another example of guidance on how to style the seller’s existing furniture and decor items.

Before-and-After Long-distance Staging Photos.

And as promised, below are some before-and-after photos of the condo. I wish we had pictures before the condo was painted and decluttered, but alas, this will have to do. Obviously taking photos with a photographer during the daytime make a difference, too.

Before: shelves in corner partially covering window.

Before: shelves in corner partially covering window.

Before: a possible location to relocate the shelves. This tweak would make the listing photos look more open instead of crammed.

Before: a possible location to relocate the shelves. This tweak would make the listing photos look more open instead of crammed.

After: to save on costs, yet still have a cohesive look, advised seller to turn books they owned spine-in on shelves. Sent photos for reference and did a quick mark-up of how to “balance” the shelves (shown above).

After: to save on costs, yet still have a cohesive look, advised seller to turn books they owned spine-in on shelves. Sent photos for reference and did a quick mark-up of how to “balance” the shelves (shown above).

Master bedroom before some minor rearranging (guidance shown above).

Master bedroom before some minor rearranging (guidance shown above).

Master bedroom before staging.

Master bedroom before staging.

After: leveraged seller’s furniture with some little tweaks and small decorative items such as the orchid and throw blanket.

After: leveraged seller’s furniture with some little tweaks and small decorative items such as the orchid and throw blanket.

Master bathroom before staging.

Master bathroom before staging.

Master bathroom before staging.

Master bathroom before staging.

After: pulled in some touches of vibrant colors and texture to showcase the master bathroom.

After: pulled in some touches of vibrant colors and texture to showcase the master bathroom.

After: additional storage space above toilet recommended by listing realtor — a collaborative effort between us, seller, and listing realtor was necessary to ensure the staging was a success.

After: additional storage space above toilet recommended by listing realtor — a collaborative effort between us, seller, and listing realtor was necessary to ensure the staging was a success.

Kitchen before staging. Cabinets were touched up and hardware added to dress up space.

Kitchen before staging. Cabinets were touched up and hardware added to dress up space.

Kitchen before staging. Magnets and personal photos/cards removed from fridge.

Kitchen before staging. Magnets and personal photos/cards removed from fridge.

After: worked with seller’s existing items such as cookbooks to cover bulky fridge wiring. Fruit and vintage rug added to bring some tasteful color into the space.

After: worked with seller’s existing items such as cookbooks to cover bulky fridge wiring. Fruit and vintage rug added to bring some tasteful color into the space.

Guest bathroom before staging and vanity mirror. Old, beat-up vanity swapped out with new.

Guest bathroom before staging and vanity mirror. Old, beat-up vanity swapped out with new.

Guest bathroom before staging.

Guest bathroom before staging.

After: new vanity mirror and staged. You can compare this to the “mock-ups” provided to the seller (shown above). The seller nailed it!

After: new vanity mirror and staged. You can compare this to the “mock-ups” provided to the seller (shown above). The seller nailed it!

Why This Long-distance Staging Project Was A Hit.

I learned a lot my first go with virtual staging and have a bunch of ideas to improve the process on my end. A huge part of this virtual staging success was that the sellers trusted me and were willing to accommodate my nit picky tweaks along the way. They executed all my feedback flawlessly and had great ideas themselves. They also understood that they would need to spend a little extra to get their home market ready. The listing agent also played an important role by being an excellent in-person resource for guidance the day before listing photographs.

Another part of the recipe for success was my ability to leverage my previous job experience in digital advertising / project management. The main branch of my last job was located in Minnesota while I was based in NYC. We had lots of other satellite locations across the states and even in Europe. I was well-versed in providing thorough feedback since we lacked the face-to-face time between colleagues. Webinar meetings and detailed e-mail communications were our main form of contact between one another.

By the way: the condo was listed on Wednesday, had a showing on Thursday, first offer on Friday, and 4+ additional offers after the open house on Sunday! It is a true testament to a successful collaboration we had staging the home together.

Like what you see? Check out more listing photOs here.

Wednesday 11.14.18
Posted by Crawford Modern
 

Our "Questionable" Kitchen Remodel

“Bad design.”

That is what an electrician told us when we took down all the walls in the kitchen of our second flip in Southern Pines. He had a point — not everyone likes an open concept. A lot of people like to be able to hide their dirty dishes away from company (I know I do considering dirty dishes may as well be a permanent fixture in our home). But, when you’re dealing with a 1700 square foot house that is the shape of a shoebox with a weird compartmentalized kitchen between two very small living spaces, you may want to consider opening things up a bit.

This 1970s ranch had a truss system that allowed us to take down the walls in the kitchen without there being any structural implications. After double-checking with a structural engineer, the kitchen walls were the first thing we demoed. When we brought in an electrician to work out a solution to ensure we had the appropriate amount of outlets to meet code requirements, he was not pleased. “Where are you going to put your blender?” “There’s no wall to hide all the cords for your appliances.” …Uhh, didn’t think of that — guess I just knew I needed the walls to come down so I didn’t have a Russian doll version of a house with shoeboxes inside of shoeboxes?

He declined the job.

Admittedly, I did doubt our decision to remove the walls for a moment there, but we proceeded with our initial plan full steam ahead.

All the walls are down in the kitchen.

All the walls are down in the kitchen.

Jim working technically where the kitchen used to be. You wouldn’t be able to see the fireplace from where he was standing originally.

Jim working technically where the kitchen used to be. You wouldn’t be able to see the fireplace from where he was standing originally.

Kitchen progress. Kept it light with white cabinetry.

Kitchen progress. Kept it light with white cabinetry.

As previously mentioned, the house was lacking in the square footage department. We wanted to maximize storage as much as possible so we decided to add some practical character by installing some shelves to flank the “entry” into the kitchen. When ordering our cabinets with Lowes Home Improvement, we asked if they had any shelves we could leverage. They could only do something that looked extremely outdated — round shelves as shown below.

Rounded shelves proposed. This simply would not do.

Rounded shelves proposed. This simply would not do.

I was determined that we needed shelves and they now needed to be custom built. There’s nothing like getting under Jim’s skin by giving him a Pinterest picture, or in this case — a primitive sketch — of what he needs to build with no formal plans whatsoever.

Jim being the best ever and building custom shelves.

Jim being the best ever and building custom shelves.

Super professional “rendering” of shelves I envisioned for the space (taped to work-in-progress shelving). This is exactly what Jim worked off of when building the shelves.

Super professional “rendering” of shelves I envisioned for the space (taped to work-in-progress shelving). This is exactly what Jim worked off of when building the shelves.

Work-in-progress shot of both shelves that flank the entryway to the kitchen.

Work-in-progress shot of both shelves that flank the entryway to the kitchen.

After we took down the walls and added some shelves, we wanted to take the kitchen a step further in openness.

We had created a multi-functional laundry room off the kitchen that also served as an office and mudroom. In an effort to make the laundry room / office seem like an appropriate extension of the kitchen, we installed a glass pocket door between the two areas. That way both rooms could play off of each other, yet remain separate—especially if the washer/dryer were running or if someone was working in the office while others were cooking or entertaining. The glass pocket door also helped add a level of sophistication we strived for in this home.

We also obviously updated the cabinets, countertops, appliances, etc, and added a counter-to-ceiling tiled backsplash, too. Were those countertops our favorite? Nope. But you have to stay on budget somewhere. I remember the countertop woman at Lowes questioned our design choices as well — “Brass hardware? Isn’t that ‘outdated?’” "A black pocket door—that sounds, um, interesting?” She thought we were absolutely clueless with designing our kitchen, too.

Thankfully our most questioned kitchen was a huge hit. We were under contract in about a week after putting the house on the market. Below are some great before-and-afters of the space.

Before: dark and depressing shoebox. Check out that green carpet—just like the golf course across the street.

Before: dark and depressing shoebox. Check out that green carpet—just like the golf course across the street.

After: lighter, brighter, and open.

After: lighter, brighter, and open.

Before: kitchen is closed off from dining area.

Before: kitchen is closed off from dining area.

After: you can entertain guests like you’re a Hibachi chef.

After: you can entertain guests like you’re a Hibachi chef.

Before: claustrophobic peninsula.

Before: claustrophobic peninsula.

After: updated peninsula and a view of the glass pocket door leading into multi-functional laundry room.

After: updated peninsula and a view of the glass pocket door leading into multi-functional laundry room.

Before: another view of the closed-off kitchen. The walls made the kitchen and two neighboring living areas seem much smaller than they were.

Before: another view of the closed-off kitchen. The walls made the kitchen and two neighboring living areas seem much smaller than they were.

After: extra storage space in kitchen with custom-built shelves.

After: extra storage space in kitchen with custom-built shelves.

The office / laundry space is an extension of the kitchen.

The office / laundry space is an extension of the kitchen.

Before: work-in-progress tiled backsplash.

Before: work-in-progress tiled backsplash.

After: finished tiled backsplash.

After: finished tiled backsplash.

A great space for entertaining.

A great space for entertaining.

Be sure to check out more of our updates for this home, here.

Have a kitchen that needs some love and don’t know where to begin? Contact us today.

Tuesday 11.06.18
Posted by Crawford Modern
 

Our Team Green Nursery

We will still be paying off George’s hospital bills until 2021 (literally) so we’re very grateful that we did not spend crazy amounts on a nursery that will be trashed by the time he is two. For now, it is still the cleanest room in the house, though. I will enjoy that while it lasts.

We kept the gender of our babe a surprise so the existing 80s green wallpaper was the perfect backdrop. Mostly everything except the crib and dresser were pulled from our staging archives and lovingly placed in the nursery. Oftentimes we will pull stuff out of George’s room to stage a house, but he doesn’t seem to notice, haha.

crawfordmodern_ginghamnurserybaby.jpg

The Dresser.

I wanted something modern and sophisticated but didn’t break the bank. Something that was a West Elm look-a-like at a fraction of the cost. We already had a white crib. I was anxious to buy another out-of-the-box white dresser in case the white coloring didn’t match the crib. Let me be clear, I am NOT someone who likes all matching furniture in a bedroom; however I didn’t want a natural wood dresser as it would not have been as nice of a contrast with the dark green wallpaper. The room was already pretty dark with the green backdrop so I wanted most large pieces of furniture to be light in nature so they would pop.

Back to the white dilemma: it may not seem like a big deal to some, but I was worried about having the two main pieces of furniture be two different tones of white. There’s nothing worse than looking like you were trying to match, but failing in the process.

It was then I determined that I needed to refinish an existing (cheap) dresser in a matching white paint. But what dresser? If you don’t know by now, I HATE refinishing things. The amount of prep work before actually getting to the “finishing” part drives me nuts. I was also eight months pregnant, super lazy, and most importantly didn’t want to be around sanding dust. It was then I stumbled upon an awesome IKEA hack for the Tarva Dresser by Kristina Lynne.

You can read the whole step-by-step process here, but in a nutshell: the Tarva Dresser is raw pine meant to be painted/stained, so you can get straight to the fun part. We brought a piece of the crib to get paint matched at a local Sherwin-Williams. I remember I asked my doctor if it was okay for me to paint while pregnant and he said, “Sure, but wouldn’t you want someone else to do it for you?” haha. While I painted the dresser, Jim cut the legs on an angle to give them a mid-century modern feel and stained them a walnut color. After the pieces dried, we put it all together. We opted for some brass pulls instead of painting the wooden knobs provided. That’s it! Honestly, this was not a headache at all — I don’t think I had one temper tantrum during this project which says a lot considering how impatient I can be, plus the added layer of pregnancy hormones. Oh, and don’t forget to mount this dresser to a wall especially if it will be used in a child’s room (IKEA provides mounting brackets).

crawfordmodern_ginghamnurseyblog2.JPG
What the dresser looked like. You can buy it at IKEA.

What the dresser looked like. You can buy it at IKEA.

Close up of modern brass knobs on dresser.

Close up of modern brass knobs on dresser.

Close up of cut and stained legs on dresser.

Close up of cut and stained legs on dresser.

The Other Important Pieces.

There are lots of other items in our team green nursery I’d like to make note of:

The quilt on the crib is handmade. We found it in Hawaii on our honeymoon. We knew if we ended up having children we would want it in the nursery. It was so exciting to break this out of storage.

The rug, cow hide, baskets, faux fiddle leaf, driftwood, and lantern were all pulled from our staging archives. The artwork is something I created myself specifically for staging a flip we did in Southern Pines.

crawfordmodern_ginghamnurseyblog1.jpg

We also have a lot of locally sourced items in our nursery:

The leather chair is from The Design Market.

The mud cloth pillows are from The Estate of Things.

The macrame piece was made by MossHound Designs.

We found the card catalog piece and light fixture thrifting locally.

…all to be used for staging at some point.

And finally, the last thing near and dear to us — the hammer and nail art pieces — artist prints by Oliver Jeffers.

crawfordmodern_ginghamnursery2.JPG

Thanks for stopping by our treasured little nursery! We had fun using a lot of things we had collected over the years. If you ever need assistance with putting together a nursery for your sweet little babe filled with meaningful items, don’t hesitate to reach out. We would be happy to help!

Thursday 11.01.18
Posted by Crawford Modern
 

Our Refinished Dresser Finds A New Home

Our first refinishing project together was a vintage French Provincial dresser found locally at the Habitat for Humanity ReStore. It was very shiny and well, ugly. I wish we had a "before" shot, but I wasn't good at documenting things back then. We decided to do the trendy thing with refinishing a dresser and paint the bottom white and stain the top. #hellopinterest. In fairness, we stripped the thing completely, opted out of using a chalk paint, and instead used a good quality oil-based paint for the base.

CrawfordModern_DresserRefinishing1.jpg

Once the dresser was refinished, we used it to stage our first flip. You may have noticed by now, but we have avoided sharing many photos of our first flip. Not because we're worried about the quality, but because our taste has significantly changed since then. WE HAVE EVOLVED. Anyways, here is a photo of the dresser in its natural French country-like habitat.. 

CrawfordModern_DresserRefinishing2.jpg

After staging that flip, we recently had acquired an antique booth at Pastimes and decided this would be the perfect first large piece to sell. It sold rather quickly. We weren't surprised because we think most of the Pastimes clientele enjoys refinished decor. That’s unfortunate for us as we HATE refinishing things. (Special place in heaven for those who have the patience to do it!) After selling this piece, we completely forgot about it for a few months.

As we were looking for another flip in Moore County, our realtor brought us by a potential comp in Pinehurst that recently went under contract. Lo and behold: there was our dresser used as a vanity in the master bath of this comp. We were amused that the person who bought this damn dresser didn't want to keep it for themselves.

Anyways, the moral of the story was this: we ultimately made money refinishing and flipping this piece to stage and then sell in our antique booth. And, we were always toying with converting a dresser into a vanity for one of our own flips and now we knew this was something local buyers could appreciate! Win-win.

Our preciously refinished dresser in its (final) resting place.

Our preciously refinished dresser in its (final) resting place.

A dresser we then subsequently refinished into a vanity. Even though we knew converting dressers into vanities was a very popular thing, we weren't sure if local buyers would buy into it. We took seeing our old dresser in a flipped house as a sign.

A dresser we then subsequently refinished into a vanity. Even though we knew converting dressers into vanities was a very popular thing, we weren't sure if local buyers would buy into it. We took seeing our old dresser in a flipped house as a sign.

Monday 09.17.18
Posted by Crawford Modern
 

A New Guest Suite

The Need.

We are your stereotypical 30-something millennials who "live at home" to save money. Even though we have a house we could theoretically move into at this point, we've opted to instead save more money, rent it out, and wait until my parents kick us out of their house basically. Now that we have been fortunate enough to provide a grandchild, I doubt our eviction will happen any time soon. #chessnotcheckers

My parents' house is a really cool home built and decorated in the 1980s. The previous owners designed and furnished everything. It has not been updated aesthetically since the 80s.

Our current freeloading domain is the upstairs and it has technically four guest bedrooms and one bath. Oftentimes we will have families come visit (filling all four rooms up) so sharing one bathroom can be a bit challenging. One of the larger bedrooms was going to become George's nursery too so guest space was becoming limited. We also knew once George arrived, we would have more frequent and longer term guests. My parents, when they bought the house back in 2008, always wanted to convert a postage stamp-sized guest bedroom and adjacent unfinished attic space into a larger guest suite with full bath. So, with George's impending debut we all decided to take this challenge on.

The goal was to start in early October (once we finished / listed a flip) and have it completed by end of December. I naively thought with a baby on the way we would have the drive to finish in a timely manner because who wants to renovate where you live, especially with a newborn? Well, we had the motivation, but of course there were a couple minor starts and stops along the way. Mostly due to the fact that subcontractors didn't want to work around Thanksgiving and Christmas?? ODD! (Don't forget to always consider holidays when coming up with timelines—not everyone is a psychopath making cuts for hardwoods 8 months pregnant around Christmas!)

The Plan.

The existing tiny guest bedroom only had the space to house one twin bed. We previously used it as a "gym" when it was not needed as a guest room. I can count the amount of times we worked out in this room on one finger. 

Our gym aka the room that stored gym equipment.

Our gym aka the room that stored gym equipment.

The skylights in this guest room are very interesting and unique. They provided light to both this room and the garage below. We knew they would sadly have to be eliminated if we were going to add a full bath. The door in the back of the room leads to the unfinished attic space. Both the door and wall would need to be demoed to combine the attic space and little bedroom into one large guest suite.

The attic space next to the room would obviously not only need to be a finished space for a bed, but also would require a large window for egress.

Attic wall that required a window.

Attic wall that required a window.

In our past flips, we did not need to consult an architect or designer to figure out the best layout as those updates were very straightforward to us. With this project however, we knew we had to hire a professional in order to make this space fully and appropriately functional.

CrawfordModern_GuestSuite3.jpg

With an architect, we determined that we would need to steal space from the other adjacent bathroom upstairs (more specifically its linen closet) in order to have more square footage to create a full bath for the new guest suite. We would also need to eliminate the existing skylights, frame out flooring, etc, so that there was more living space since the new bathroom would be taking up quite a bit of it. And since the skylights had originally provided light to the garage, we had to work with an electrician to add new lights down there as well.

Because we lost the existing bathroom's linen closet, we then converted the little guest bedroom's into one. That meant we had to close up the closet opening in the old guest room and create a new one facing out into the adjacent hallway for everyone to be able to access. And since the guest suite is on a different level, we had to frame up a new closet floor to be level with the new hallway access. Kind of confusing to explain, but I guess you can understand how this was not a very straightforward process of just plunking a bathroom into a space, throwing a bed in there too, and calling it a day. 

The new linen closet opening. As you can see we had to frame out the closet floor so that it would be level with where our dogs are standing.

The new linen closet opening. As you can see we had to frame out the closet floor so that it would be level with where our dogs are standing.

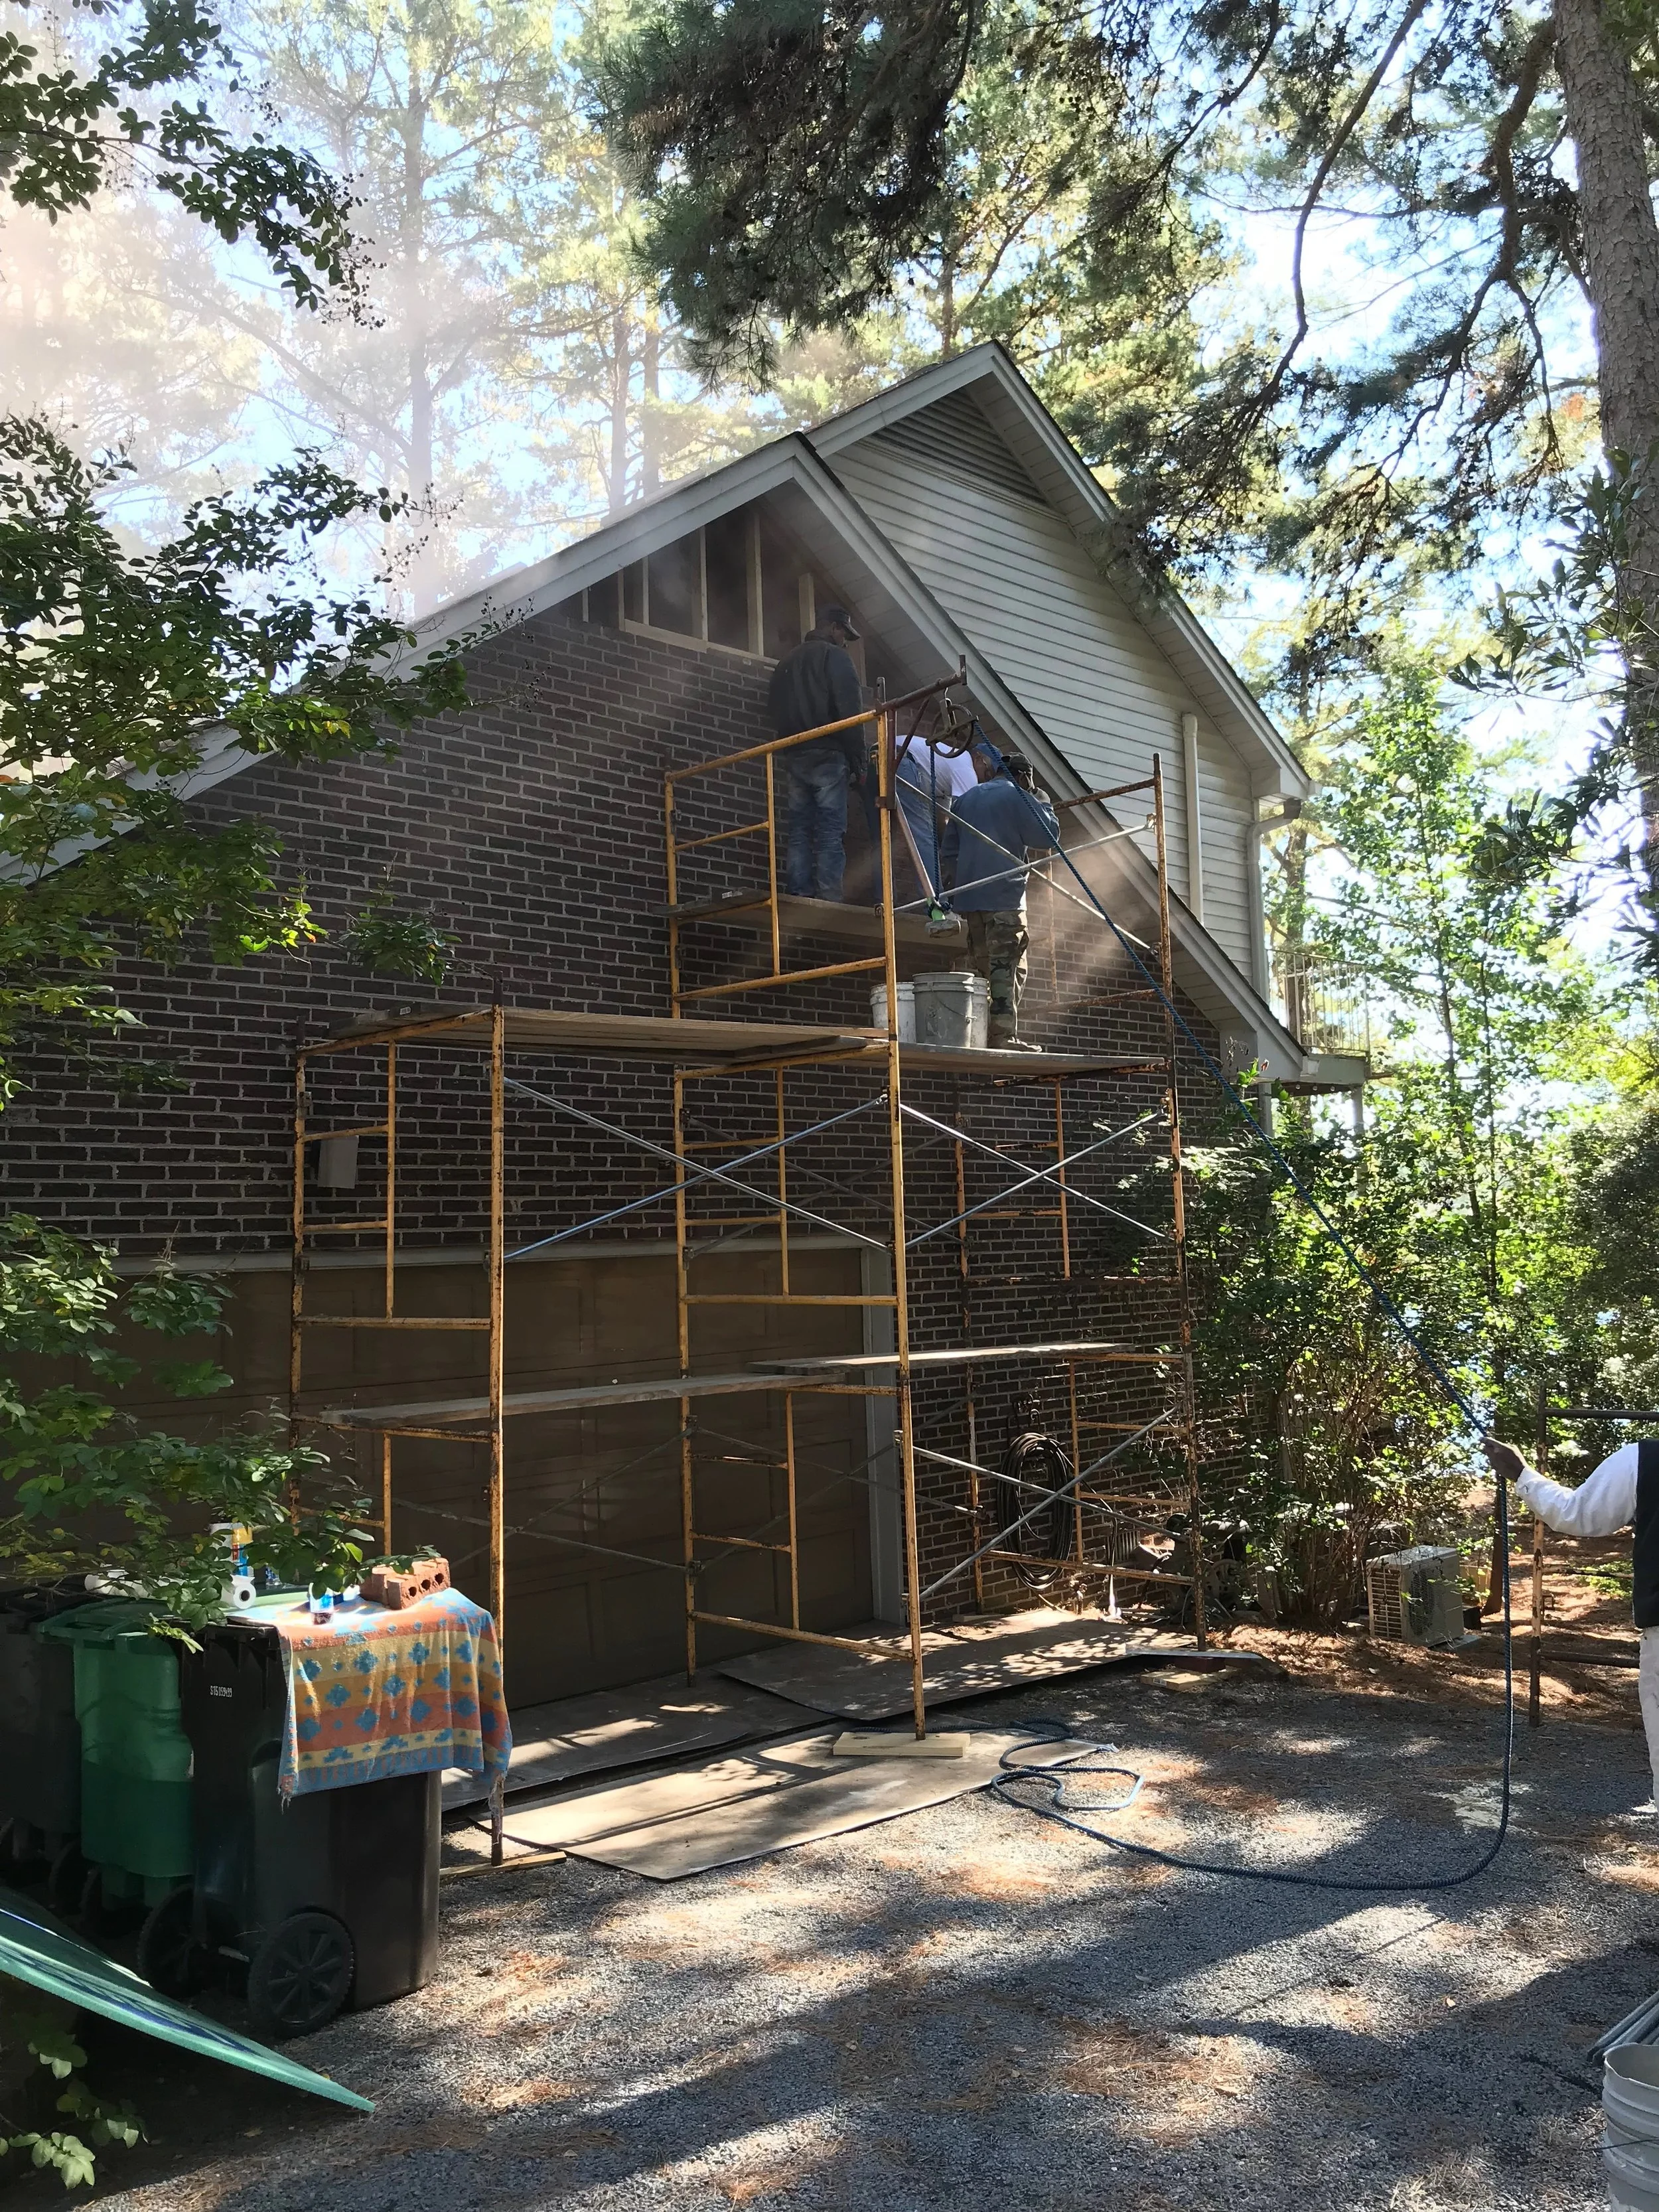
As previously mentioned, a window also had to be added for egress. The exterior is brick so we hired a professional mason to cut an opening in the brick veneer and patch it back once we installed the new window. We always hire professionals when we think things are even slightly out of our wheelhouse. While we could go the popular DIY route these days and watch YouTube videos on how to do it, it saves a lot of time and heartache to have it done by a skilled mason with the appropriate crew, tools, and experience. Totally worth the extra money spent.

Professional mason and his crew cutting brick veneer for window opening. Lots of scaffolding required.

It goes without saying we then had to frame out a closet for the new bedroom area (as we sacrificed the original one for a new linen closet in the hallway), add insulation, install sheetrock on the walls and ceilings, and install / refinish matching hardwood flooring so it was cohesive space.

Saying goodbye to the unique skylights.

Saying goodbye to the unique skylights.

Framing out some walls in the unfinished attic space. We added a custom attic door for additional storage within the eaves.

Framing out some walls in the unfinished attic space. We added a custom attic door for additional storage within the eaves.

The Design.

In terms of the bathroom finishes, we wanted to design something that was classic with both modern and retro touches—ultimately reflecting each of my parents' styles. Since we don't know when we will get around to updating the rest of the home (kitchen, master bath, guest bath, etc) we also wanted the bathroom to fit with the vibe of the rest of the home, but also work with future updates. A delicate balance.

Our tile selections for bathroom.

Our tile selections for bathroom.

Work-in-progress herringbone tile floor.

Work-in-progress herringbone tile floor.

We selected a carrara marble hexagon tile for both the shower floor and panoramic niche. We did 3 x 8 white subway tile (regal bianco gloss ceramic - now discontinued) for the shower walls all the way up to the ceiling. The bathroom floor was a little more expensive—both material and design-wise—a 3 x 12 bardiglio bianco porcelain tile in a herringbone pattern with a nero marquina black marble border. 

Adding the black border around the herringbone pattern was a little complicated. We installed the herringbone first and then cut the tile with a grinder so that the herringbone pattern edges that meet the black border would be perfectly straight.

Cutting the herringbone with a grinder.

Cutting the herringbone with a grinder.

The budget for this bathroom was more flexible than our flips in the past so we could pick out more expensive finishes. We are very proud with how it turned out. It feels like a spa retreat and we find ourselves resisting using this bathroom instead of our existing one! 

Floating vintage-looking sink with shelf for storage above.

Floating vintage-looking sink with shelf for storage above.

Our dogs were likely the subconscious coloring inspo for this bathroom.

Our dogs were likely the subconscious coloring inspo for this bathroom.

Floor tile detail.

Floor tile detail.

Panoramic shower niche detail.

Panoramic shower niche detail.

We didn't move the skylights up so we wouldn't have to touch the roof. Instead, we created little niches for additional storage.

We didn't move the skylights up so we wouldn't have to touch the roof. Instead, we created little niches for additional storage.

The Delays.

So of course in typical home renovation fashion, there were delays with the guest suite as a whole. The biggest delay was refinishing the hardwoods. This is something we could have tackled ourselves, but we were in the process of acquiring another flip, preparing for hosting Christmas in North Carolina, and also a baby on the way.

No one could get into our house to refinish the floors until after George's due date in mid January. I would be lying if I said this was the first meltdown I had for this renovation, but it definitely was the biggest. I would also be lying if I said my meltdowns were due to pregnancy hormones, but let's be honest, I have always been known to have a good old-fashioned renovation meltdown.

Basically George made a somewhat dramatic appearance a week earlier than expected and the flooring guys came in sometime afterwards. We moved the bedroom furniture in sometime after that. I wouldn't know exactly how it all went down because I completely blocked this part of the renovation out of my mind. Looks great though, haha! 

We've had a few guests stay in the suite since and it's been so convenient and stress-free to be able to have separate bathrooms and living spaces especially while experiencing all the postpartum fun of having a newborn. 

Lord help us this guest suite was going to be done before George arrived.

Lord help us this guest suite was going to be done before George arrived.

The refinished floors in all their glory after the arrival of George.

The refinished floors in all their glory after the arrival of George.

All-in-all we are really happy with how it turned out and our only complaint was that it was not completed on time. Jim really stepped it up and finished it a week after the flooring guys were done so we could start on another flip right away.

The reason this entire guest suite came to fruition.

The reason this entire guest suite came to fruition.

tags: crawford modern, guest suite, bathroom remodel
Sunday 09.02.18
Posted by Crawford Modern
 
Newer / Older

Frequently Asked Questions Our Renovation Process Our Blog